How to make The Mortmain party skirt!

This year, I’ve been coveting a sparkly, twirly skirt for festive get-togethers. Paired with a smart top, an over-the-top statement necklace, and some fab heels, I’m hoping for a classic, chic look to see me through party season. Having found some irresistible fabric, I thought a hack of The Mortmain dress into a skirt was just the thing. Add a lining, and you’ve got a luxe, bespoke skirt that’ll get you in the party mood.
To make The Mortmain skirt, you’ll need approximately 1 1/2 metres of fabric, 1 1/2 metres of lining fabric, corresponding thread and an 8” metal teeth zip.

It’s always best to prep your fabric before sewing, so give it a quick wash before you sew with it. The last thing you want is to wash your skirt after making it and have it shrink - disaster! You’ll then need to find the size of skirt that you want to make. Use your waist measurement and pick the corresponding size from The Mortmain instruction booklet. Now we’re ready to get started!
You’ll need to cut the skirt front and the skirt back, as per the pattern pieces, in both your fashion fabric and your lining fabric. We’ll be cutting a waistband later, so don’t worry about that now. Don’t forget to snip the notches - you’ll need these for your pleats.

Sew the skirt back pieces to the skirt front along the side seams, with right sides together. Do this for both your main fabric and your lining fabric. Finish the seams and press open.

We’ll be constructing the skirt pleats with the main fabric and the lining fabric as one. With wrong sides together, pin the top of the main fabric and lining fabric skirts in a couple of places to hold them both steady.

Then, fold your pleats and pin in place, as per The Mortmain instructions. We’ve got a further tutorial on constructing box pleats here. I decided to make mine by folding my pleats to the front of the skirt, but it’s up to you which you do. Baste the pleats into position.


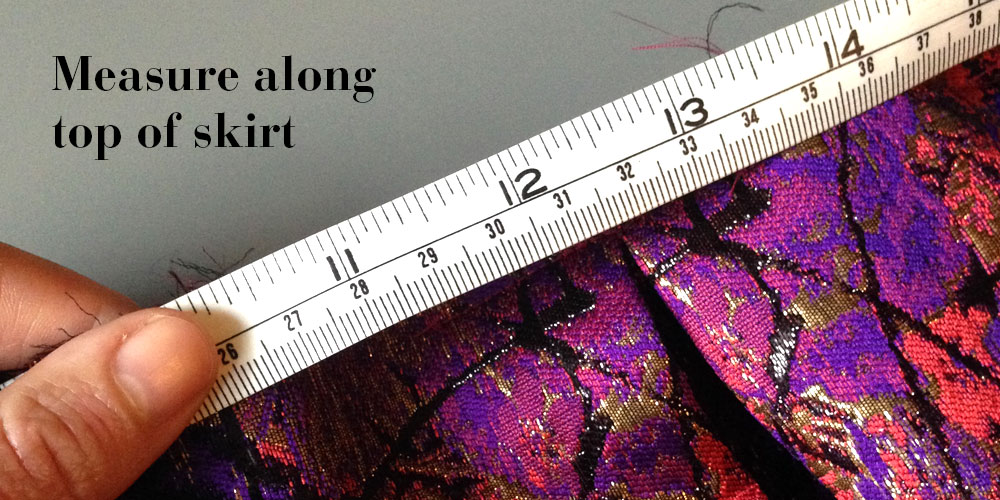
Now we’re going to make our waistband, which will simply be a long rectangle - easy! Measure all along the top of the skirt to find out the width. We’ll be cutting the waistband on the fold, so half this measurement and note it down.
Then, decide the height of the waistband you’d like, and add on 3 cm for the seam allowance. I wanted my waistband to be about 7cm tall, so I made my waistband piece 10cm tall.
You’ll probably find it easier to make a paper waistband piece from these measurements first, so draw a rectangle, as so:

Then cut your fabric pieces on the fold - one main fabric and one lining. If your fabric is particularly light, then you may want to use interfacing to add stability. With right sides together, sew the waistband main fabric and lining together along the long top edge. If your fabric has a directional print, ensure that this is indeed the top to save unpicking later!
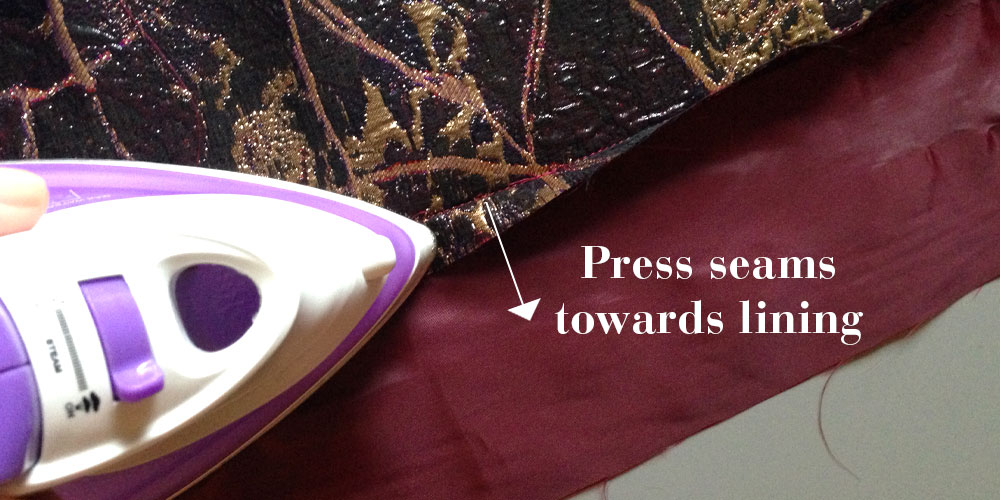
Press the seams towards the lining. To ensure that the lining doesn’t roll out and peek out the top of your waistband, understitch it in place. This simply involves sewing the seam allowance to the lining fabric, as close to the seam line as possible. Press the waistband flat. See - perfect!

Open up the waistband again, and press the lining fabric up by 1cm onto the wrong side, all along the bottom edge.

Pin and sew the right side of the waistband piece to the right side of the skirt top, using the standard 1.5cm seam allowance.

Grade the seam that sits away from the front of the waistband in order to reduce bulk. I did this using an overlocker, as my fabric was fraying hugely! But you can simply trim the seam. Press up onto the waistband.

Fold the waistband lining back to the inside of the skirt. The folded up edge of the waistband lining will sit neatly over the waistband seams. Press and pin in place. You can then either blind stitch the waistband lining into place from the inside, or you can move the pins from the inside of the skirt to the outside, and topstitch in place, which is what I did.


Using The Mortmain instructions, sew the back seam of your skirt and insert your zip. The technique is exactly the same as for the dress, you’re just using a shorter zip!

We’re nearly there! The last step is to try on your skirt and decide how long you want it. Hem as usual, I’ve overlocked the bottom of my hem and then blind stitched it from the inside, for an invisible finish.

Ta da! The Mortmain skirt, ready for cocktails and dancing! Buy The Mortmain now to make your very own!
